Caliper Overhaul
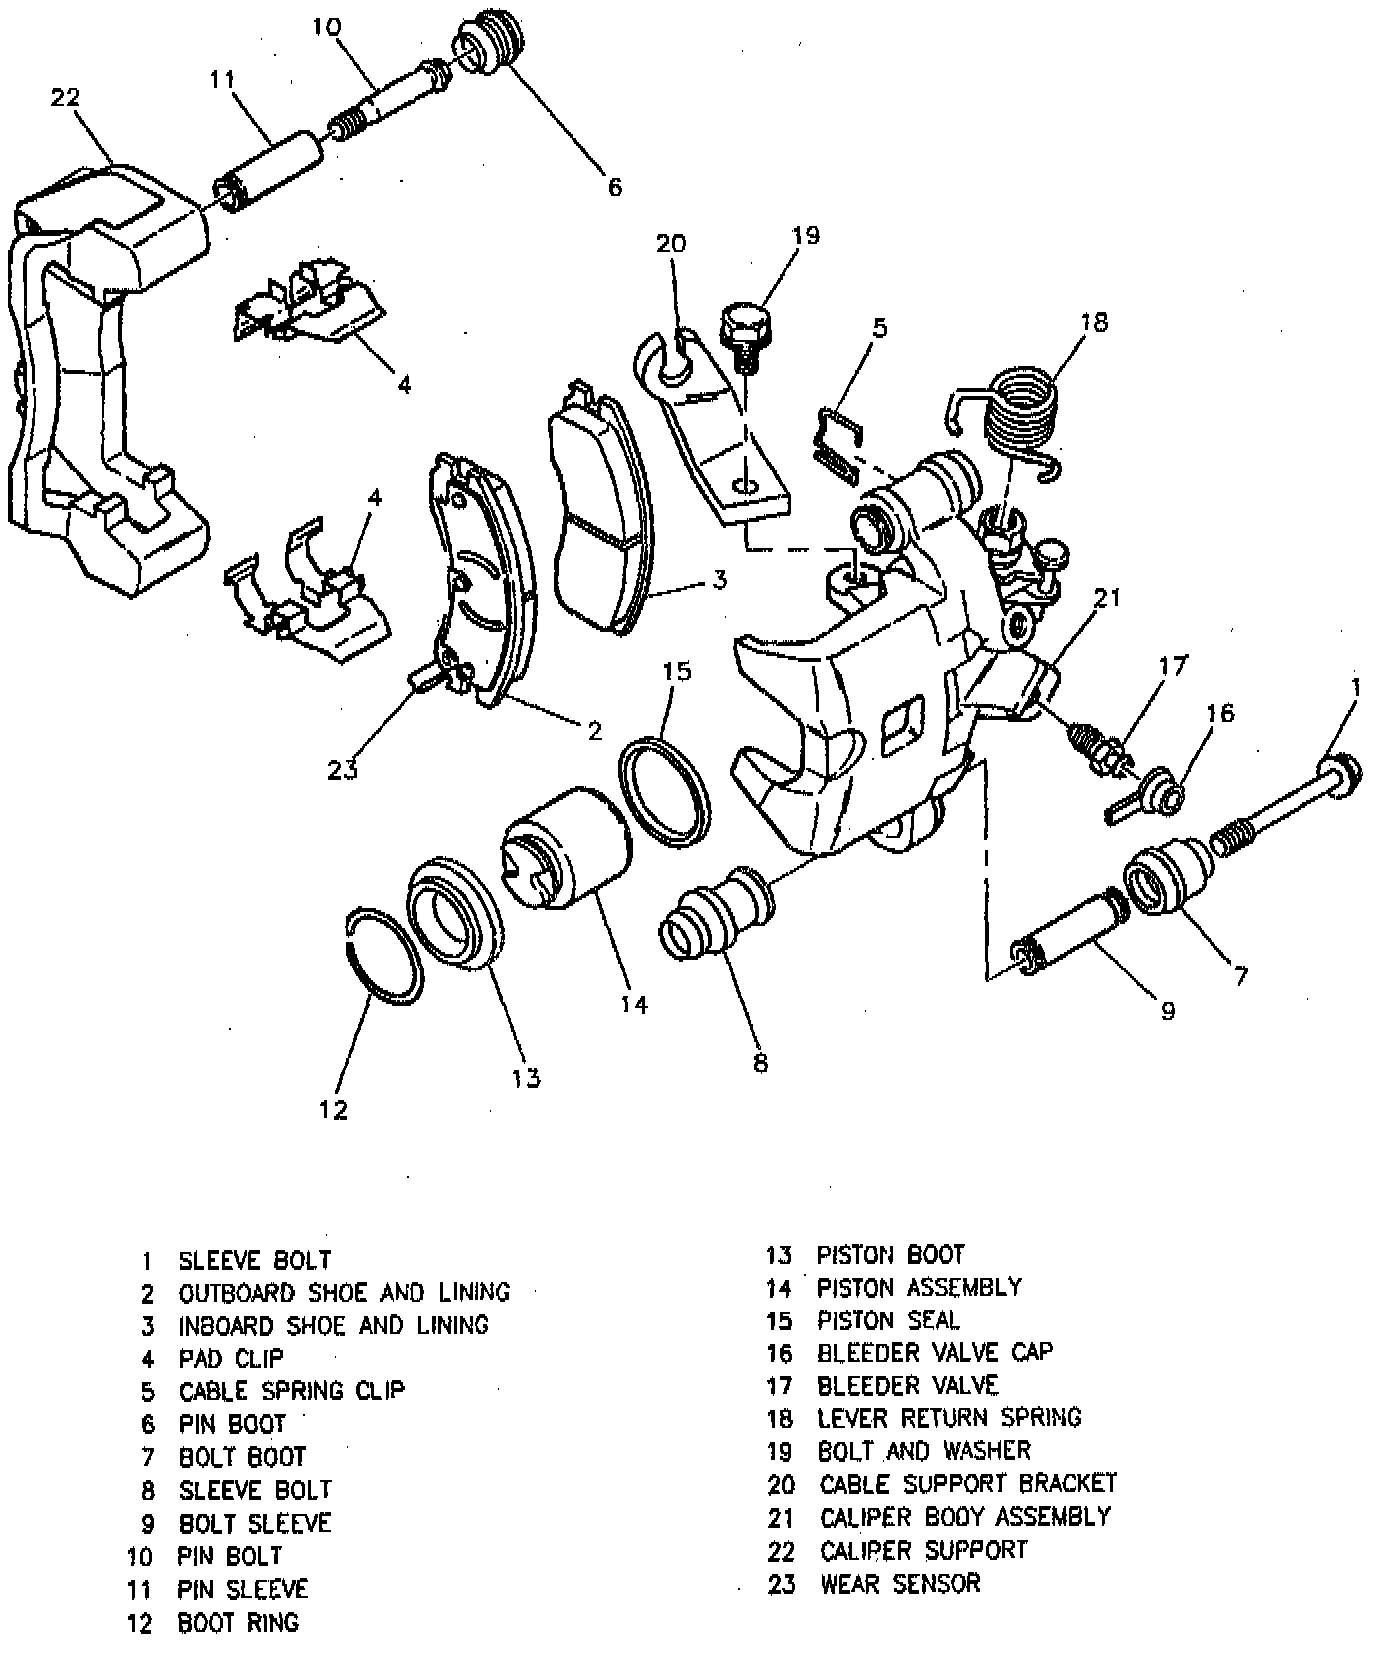
REMOVE OR DISCONNECT
1. Caliper completely from vehicle as previously described.
NOTE: Pad interior of caliper assembly with clean shop towels to prevent damage to piston assembly as it is removed.
CAUTION: Do not place fingers in front of the piston in an attempt to catch or protect it when applying compressed air. This could result in serious injury.
2. Piston assembly using low pressure compressed air into the caliper inlet hole. Piston will come out through piston boots. An alternate method for piston assembly removal is to use spanner type tool in slots in end of piston to thread piston assembly out of caliper.
3. Boot ring and piston boot. Use small screwdriver to pry up one end of boot ring. Work boot ring out of caliper groove.
4. Piston seal from groove in caliper body assembly. Use a small wooden or plastic tool (not metal) to start piston seal out of caliper bore groove.
5. Bleeder valve and bleeder valve cap.
6. Lever return spring only if replacement is required. Use screwdriver to disengage return spring from parking brake lever. Then, unhook spring from stopper pin.
7. Pin boot and bolt boot from caliper body.
8. Bolt sleeve and sleeve boot from caliper body.
9. Pin bolt and pin sleeve from caliper support. Clean All parts in clean, denatured alcohol. Dry with unlubricated, low pressure compressed air. Blow out all passages in caliper body assembly and bleeder valve). Inspect Piston assembly for scoring, nicks, cracks, wear or corrosion. Replace piston if any damage is found. Piston bore for scoring, nicks, wear or corrosion. Use crocus cloth to polish out light corrosion. Otherwise, replace caliper. Do not hone caliper bore. Seal groove in caliper bore for nicks or burrs. If found, replace caliper. Boots for cuts, tears or deterioration. If damaged, replace boots. Bolt sleeve and pin sleeve for corrosion or damage. Replace corroded or damaged sleeves. Do Not attempt to polish away corrosion.
INSTALL OR CONNECT
1. Pin bolts and pin sleeve to caliper support. Tighten Caliper sleeve bolt to 27 Nm (20 ft. lbs.). Lubricate pin sleeve OD with silicone grease.
2. Compress lip on sleeve boot and push it all the way through caliper body assembly until lip emerges and seats on inboard face of caliper ear. Lubricate sleeve boot with silicone grease to ease assembly.
3. Push bolt sleeve in through lip end of boot until boot seats in sleeve groove at other end. Lubricate sleeve OD with silicone grease to ease assembly.
4. Bolt boot onto caliper body.
5. Pin boot over pin sleeve (installed on caliper support). Install small end of boot over pin sleeve until boot seats in pin groove.
6. New lever return spring if replaced. Position spring with hook end around stopper pin, then pry other end of spring over lever.
7. Bleeder valve. Tighten Bleeder valve to 11 Nm (8 ft. lbs.).
8. Bleeder valve cap.
9. New piston seal. Lubricate seal with clean brake fluid. Make sure seal is not twisted.
10. Piston boot onto piston assembly.
11. Piston assembly and boot into bore of caliper body assembly. Lubricate piston assembly OD with clean brake fluid. Start piston assembly in by hand, then thread into bottom of caliper bore using spanner type tool in slots in end of piston assembly.
12. Boot ring. Make sure outside edge of piston boot is smoothly seated in counterbore of caliper body assembly. Work boot ring into groove near open end of caliper bore using care not to punch piston boot between boot ring and caliper body. After installing ring, lift inner edge of boot next to piston assembly and press out any trapped air. Boot must lay flat.
13. Caliper as previously described.