Inner Tripot Joint and Seal Assembly
^ Tools Required:- J 8059 Snap Ring Pliers
- J 35566 Earless Seal Clamp Tool
- J 41048 Swage Tool
REMOVE OR DISCONNECT
1. Larger seal retaining clamp (7) from tripot joint with side cutter and discard.
Important: Do not cut through seal (9) and damage sealing surface of outer housing (2) and trilobal tripot bushing (8).
2. Small sear-retaining cramp (10) from axle shaft (11) with side cutter and discard.
3. For swage ring removal, use a hand grinder to cut through the ring (taking care not to damage the axle shaft).
4. Separate seal (9) from trilobal tripot bushing (8) at large diameter and slide seal away from joint along axle shaft (11).
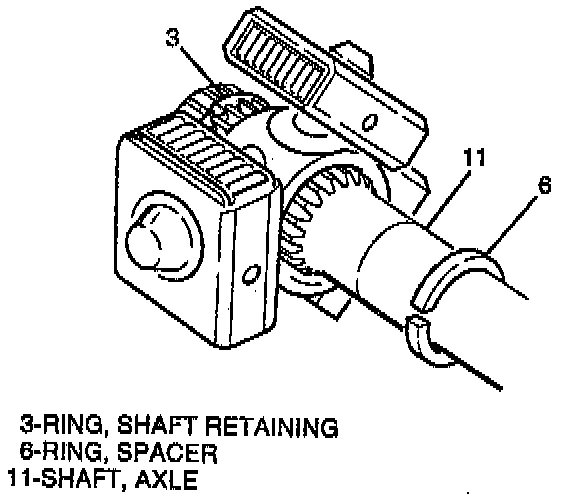
5. Housing (2) from spider (4) and shaft (11).
6. Spread spacer ring (6) with J 8059 and slide spacer ring and spider (4) back on axle shaft (11).
7. Shaft retaining ring (3) from groove on axle shaft (11) and slide spider assembly off of shaft.
8. Trilobal tripot bushing (8) from housing (2).
9. Remove spacer ring (6) and seal (9) from axle shaft (11).
Clean
^ Bearing blocks, spider and housing thoroughly with clean solvent. All traces of old grease and any contaminants must be removed.
Inspect
The following parts for damage or wear:
^ Joint seal
^ Spider Housing
^ Trilobal tripot bushing
^ Bearing blocks
INSTALL OR CONNECT
1. New swage ring (10) on neck of seal (9). Do not swage.
2. Slide seal (9) onto shaft (11) and position neck of seal in seal groove on axle shaft (11).
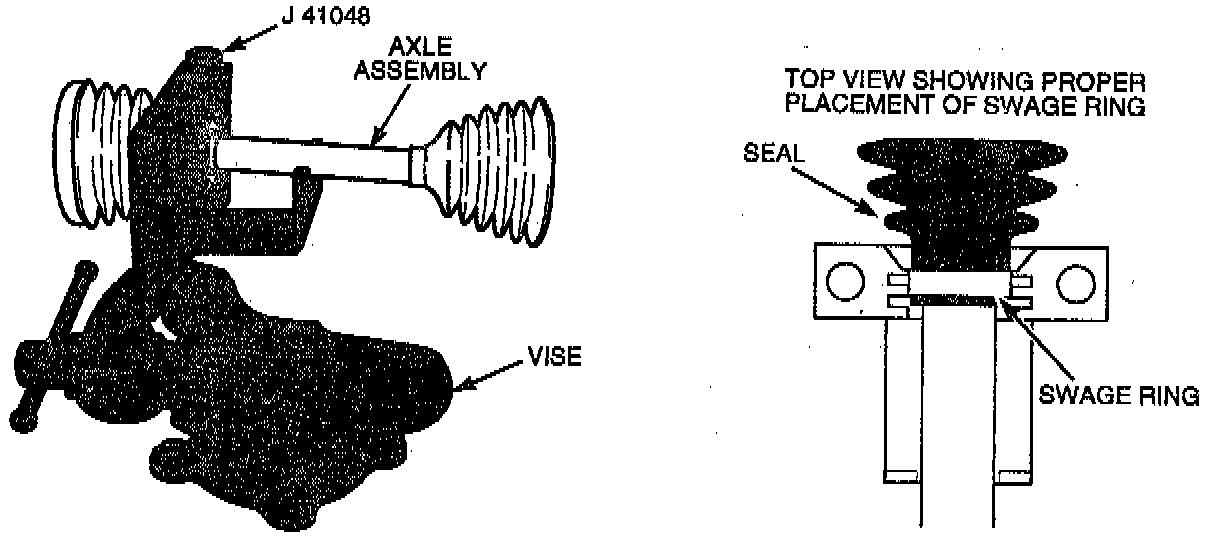
3. The swage ring is swayed using J 41048 by the following method:
- Position outboard end of halfshaft assembly in tool.
- Align the swage ring as shown in the figure.
- Place top half of tool on lower half of tool.
- Make sure there are no pinch points on the seal before proceeding. This could cause damage to the seal.
- Insert bolts and tighten by hand until snug.
Important:
^ Make sure that seal, housing and swage ring all remain in alignment.
^ Tighten each bolt 180° at a time, using a ratchet wrench. Alternate between each bolt until both sides are bottomed.
^ Loosen bolts and separate the dies.
^ Check swayed ring for any "lip" deformities. If present, place the ring back into the tool making sure the ring covers the whole swaying area. Then re-swage the ring.
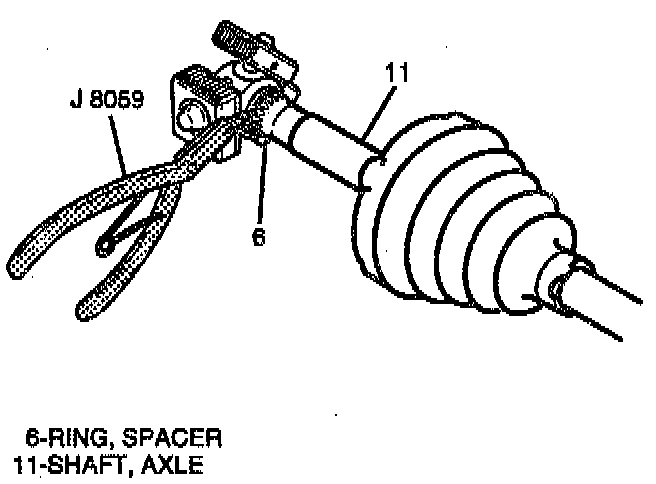
4. Spacer ring (6) on axle shaft (11) and beyond 2nd groove.
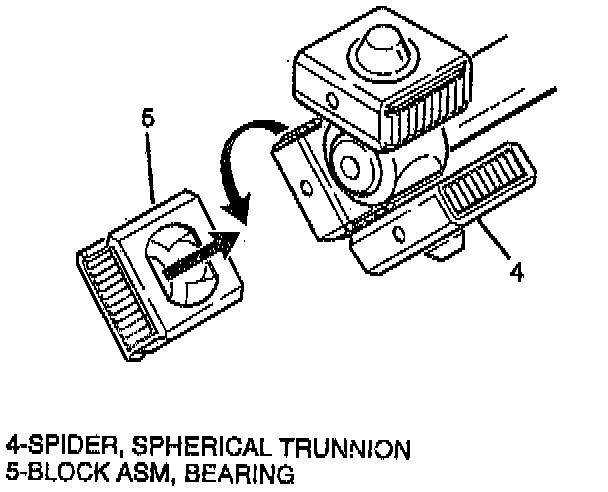
5. Attach bearing blocks (5) to spider trunnions (4) as follows:
- Apply a small amount of grease to inside of bearing blocks prior to reassembly.
- Align flats on the opening in the bearing block (5) with flats on spider trunnion (4).
- Attach bearing block (5) to spider trunnion (4).
- Rotate 90° to secure block to spider
6. Slide spider assembly against spacer ring (6) on shaft (11).
Important: Be sure that counterbored face of spider (4) faces end of shaft (11).
7. Shaft retaining ring (3) in groove of axle shaft (11) with J 8059.
8. Slide spider (4) towards end of shaft (11) and reseat spacer ring (6) in groove on shaft.
9. Place approximately half of grease provided in seal (9) and use remainder to repack housing (2).
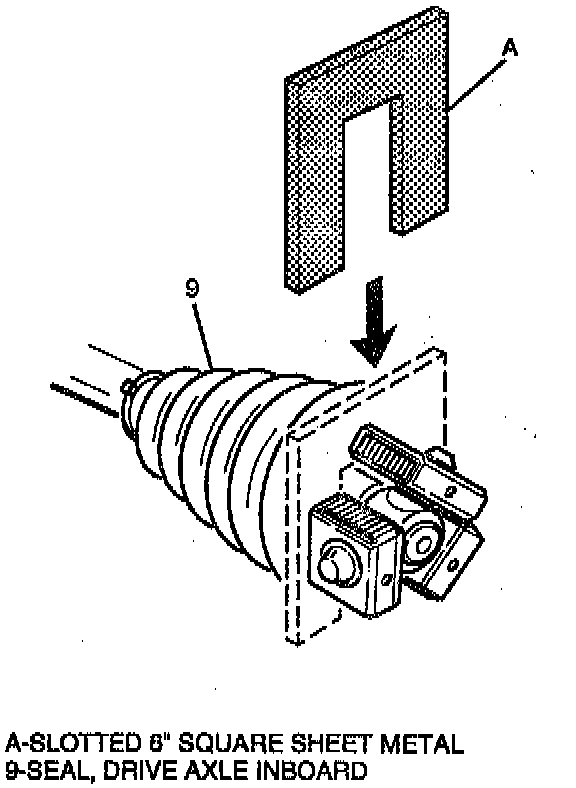
10. Place a slotted 6 inch square piece of sheet metal between seal (9) and bearing blocks (5) to maintain proper bearing block alignment during reassembly.
11. Trilobal tripot bushing (8) to housing (2).
12. Position larger clamp (7) on seal (9).
13. Slide housing (2) over spider assembly on shaft (11) and remove slotted sheet metal plate.
14. Slide large diameter of seal (9), with larger clamp (7) in place over outside of trilobal tripot bushing (8) and locate lip of seal in groove.
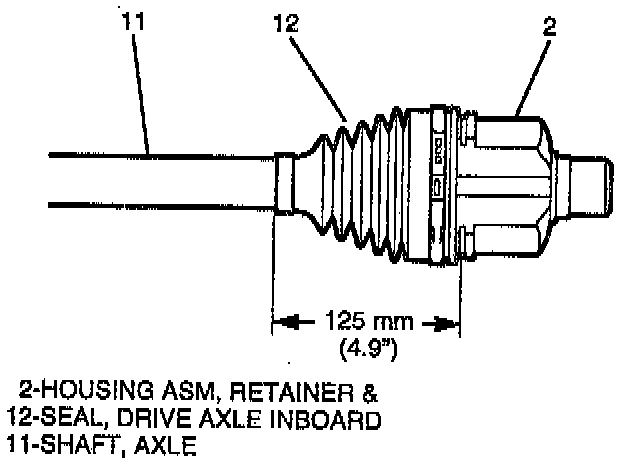
15. Position joint assembly at proper vehicle dimension.
Important: Seal (9) must not be dimpled, stretched or out of shape in any way. If seal is not shaped correctly, carefully insert a thin flat blunt tool (no sharp edges) between large seal opening and trilobal tripot bushing (8) to equalize pressure. Shape seal properly by hand and remove tool.
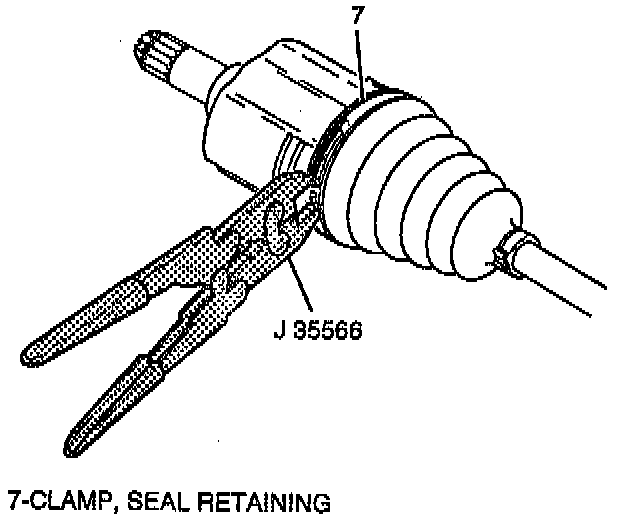
16. Latch seal retaining clamp (7) with J 35566.
Important: Make sure that seal (9), housing (2) and large clamp (7) all remain in alignment while latching.